Those looking for one-of-a-kind rustic furniture should consider live edge pieces because of its distinctive natural appearance, which is one of the trendier trends.
What is meant by the term “live edge” wood?
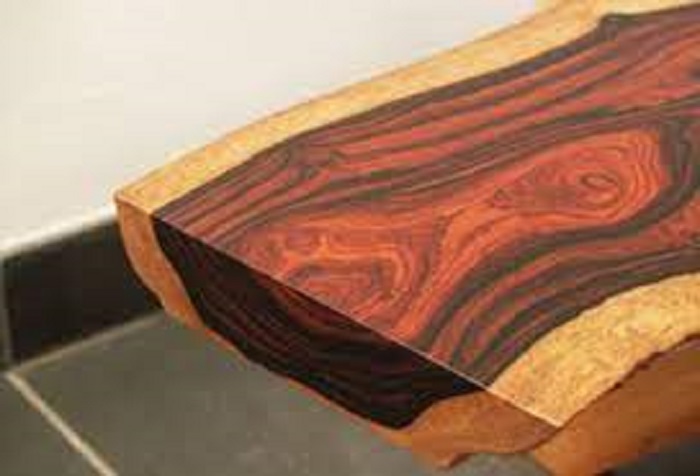
Finish Live edge wood is a type of wood that is distinguished by its natural edges that have not been polished. Wood slabs with a live edge retain the natural, unfinished appearance of the piece of wood from which they were cut, including its knots, grain, and any burrs or burls that may be present. It is impossible to find two pieces of live edge furniture that are exactly the same because the edges of the wood are left unaltered from the tree it came from.
The raw aesthetic appeal of live edge pieces has made them a sought-after component in the design of modern farmhouse and mid-century modern interiors. Live edge wood is frequently used for the tops of coffee tables, dining table tops, worktops, bar tops, headboards, cutting boards, kitchen islands, shelves, end tables, workstations, and benches by woodworkers and interior designers.
How to Purchase Wood with a Live Edge.
Also Read; What are Bifold Doors and Why You Need Them
When shopping for a live edge slab, it is not enough to simply look for an attractive piece of wood; instead, you must be certain that the slab of live edge wood you purchase is suitable for the purpose you have in mind for it.
Check to see that the measurements of the slab are accurate.

When searching for a piece of live edge, the three most significant characteristics to pay attention to are the piece’s dimensions, thickness, and flatness. Instead of purchasing a live edge slab online and installing it on your own, it is recommended that you consult with an expert in your neighbourhood lumberyard. A slab that is acquired online will not only be more expensive owing to the expense of shipping, but it will also be difficult to know exactly what you are getting because you won’t be able to view the slab in person.
Choose the appropriate species of wood.
Woodworkers are not limited to utilising only the conventional kinds of wood when creating live-edge pieces of furniture because of the twisted appearance of the piece. In live edge woodworking, common types of wood that are used include alligator juniper, ash, black walnut, cherry, claro walnut, hackberry, hickory, maple, mesquite, redwood, sycamore, vachellia nilotica, and salvaged wood. Other types of wood that are used include vachellia nilotica and salvaged wood. Before deciding on a slab of wood, you should consider how the various wood hues will look in your house.
You have the option of purchasing a completed or unfinished slab.
In addition, you will need to choose whether you want a finished or unfinished slab. The price of unfinished slabs is far lower than the price of finished slabs; but, in order to get it finished, you will either need to be handy enough to do it yourself or pay someone else to do it for you.
How to Put a Finish on a Wood Slab with a Live Edge
Before you can use a live edge slab of unfinished wood for your do-it-yourself woodworking project, you will need to be familiar with the right way to finish the slab if you purchase one of these slabs.
Strip the wood of its bark and sand it down.
Before you begin to sand, you should first peel off the bark section by section using a chisel. Be sure to work along the borders of the slab to avoid gouging the surface while you do this. Sand your wood slab using either a portable belt sander or sandpaper, beginning with sandpaper that has a grit of 120 and working your way up to sandpaper that has a grit of 220.
Butterfly keys are used to separate the bridge’s wooden supports.
Butterfly keys are little chunks of wood that can be inlaid into the face of the slab in order to stabilise cracks and gaps. These joints are also referred to as bowtie joints or dutchman joints. Create a pocket in the slab with a router and chisel that is large enough to hold the butterfly key, and then use clear epoxy to lock the key in place after it is in position. After the epoxy has had time to dry, sand the butterfly key until it is completely smooth.
Patch up any openings in the slab.
This needs the use of a two-part epoxy, but before you begin, it is a good idea to test the colour of your finish and epoxy to ensure that they are compatible with one another. On get an idea of the finished colour of your sculpture, apply a little amount of a test finish to the underside of the slab. After the finish has had enough time to dry, you should test a small amount of epoxy. In the event that the epoxy does not correspond, you will have to use an additive to tint the epoxy in order to produce the desired hue.
While the epoxy is being mixed, carefully pour it into any holes that may exist in the slab. A steady pour allows the epoxy to slowly sink into the space, which helps prevent air bubbles from forming. If there is a hole that goes all the way through to the other side of the slab, you can prevent epoxy from escaping through the hole by applying masking tape or plumber’s putty to the underside of the hole. Don’t worry if you get some epoxy on the wood slab because you’ll be sanding it again before the project is finished. The piece will still look great.
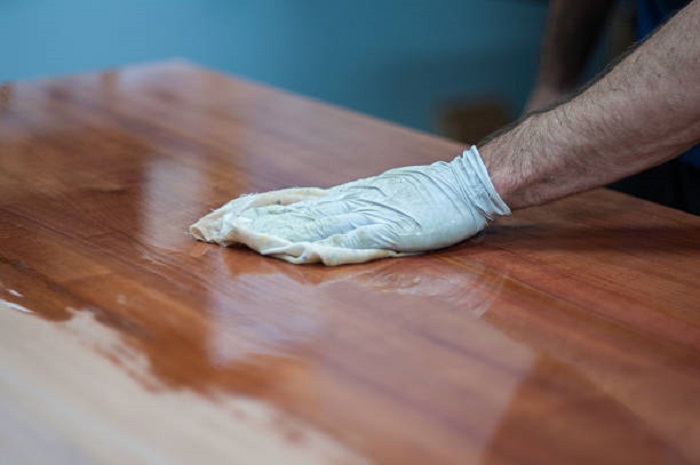
Complete the slab and then seal it.
After the epoxy has had ample time to cure, you should sand the slab one more time and then thoroughly vacuum your whole work area to remove any stray dust before applying the finishing layer. To achieve a straightforward oil finish, apply three coats of polyurethane with a sponge brush, and then use sandpaper with a grit of 500 after each coat has had a chance to dry.
After that, wipe the surface of the slab clean with mineral spirits, and then wet-sand the slab using a sanding pad with a grain of 2000. You may also try applying three coats of shellac and then sanding between each coat with sandpaper that has a grain of 400. This will give you a surface that is glossier. Use a clear lacquer spray to put the finishing touches on the artwork. Wait until the finish has completely hardened before using the slab for anything.